Defining the public interface
The tool bar's design calls for three events, one for each button's clicked event. Applications using the tool bar can connect these events to actions or scripts of their own.
Defining the events
For the clipboard tool bar, there are three events which must be signaled when their respective push buttons are selected. There are two different ways to do this.
• The easiest way to signal the events is by promoting the clicked event of each button to the tool bar part, so that when the buttons are clicked, the tool bar part automatically signals an event.
• The second technique is to add event-to-script connections that run when each button is clicked. In the script, you write Smalltalk code that signals the event for the tool bar.
Let's explore each technique further.
Promoting events
Switch to the Public Interface Editor and select the Promote tab. On this page, you select actions, events, and attributes from the subparts contained in your class and add them to the public interface of the class itself.
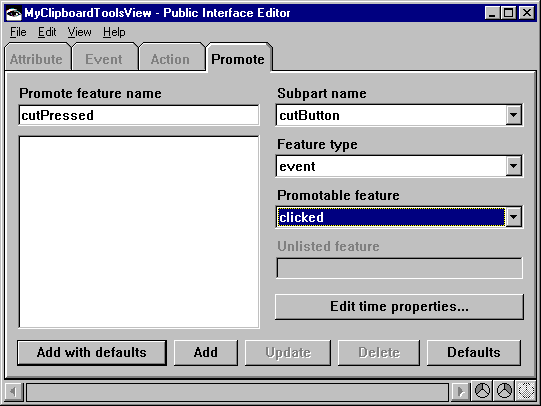
Let's fill in the page for the Cut push button:
1. In the Promote feature name field, type cutPressed, the name of the event that the tool bar is to signal.
2. From the Subpart name drop-down list, select CutButton.
3. From the Feature type drop-down list, select event.
4. From the Promotable feature drop-down list, select the clicked event.
The page should look like the following:


Select the Add push button. Now, when the push button is clicked, its clicked event is passed to the tool bar, which automatically signals the cutPressed event.
This technique works best when you just want to pass events from one part through another, but you don't have any other logic that you need to perform when the event occurs. In more advanced parts, you might want to perform some Smalltalk logic before you have the tool bar signal its event. For those situations, use event-to-script connections, as in the next example.
Signaling the events from scripts
For the Copy push button, try using an event-to-script connection to signal the event for the tool bar part.
The first step is to define the event that will appear on the clipboard tool bar's public interface. Switch to the Public Interface Editor's Events page. In the Event name field, type in copyPressed. Next, select Add with defaults. Notice that copyPressed appears in the Event symbol field. Now the copyPressed event will appear on the tool bar's connection pop-up menu.

It is a good practice to keep the event name and the event symbol the same.
Switch to the Script Editor and select New Method Template from the Methods menu. Create a new instance method called copyClicked with the following source code:
copyClicked
"Signals that the copy button has been clicked."
self signalEvent: #copyPressed.
Leave this method in your runtime application, MyRunSamplePartsApp.
When this code runs, it calls the signalEvent: method and passes the symbol #copyPressed. VA Smalltalk looks up the symbol to find the event name (copyPressed in this case) and notifies parts interested in the event that the event has occurred. "Parts interested in the event" refers to any part that uses the event in one of its connections.
The last step is to make a connection that runs the script when the push button is clicked. Switch back to the Composition Editor, and from the Copy push button's connection pop-up menu, select the clicked event. Move the mouse over the free-form surface, display its pop-up menu and select Event to Script. Select the copyClicked script from the connection dialog that is displayed. Now, when the Copy push button is selected, it triggers the clicked event which runs the copyClicked script. This script then triggers the copyPressed event for the tool bar part.
All that remains is the Paste push button. Choose one of the two techniques you just learned to have the tool bar signal the pastePressed event.
Save your part.
Last modified date: 07/17/2020