Example: Renaming a class and changing its methods
Example: Defining the classes ScreenPMCapture and ScreenWinCapture describes how to define a platform-specific class. Example: Implementing methods for ScreenPMCapture and ScreenWinCapture describes how to add methods, one of which is platform-specific, to the class. If you completed these examples, but only created a class that works on one platform, you can easily change the class and its methods so they work on the other platform by filing out the code, changing it, and filing the changed code into your image.
Suppose you created the class ScreenPMCapture and implemented its methods. To now create ScreenWinCapture and change the method saveGraphicImage so it grabs BMPs for Windows tools, complete the steps given below.

For the sake of illustration, the steps show how to work with code filed out in the generic chunk format. If you want simply to create the other class, you might file out ScreenPMCapture in the VAST chunk format, and then use one of the browser's File In menu options to add the changed code to your image.
Filing out ScreenPMCapture in the generic chunk format
Begin by filing out the class ScreenPMCapture:
1. Set your system so it files out components in the generic chunk format. To do this, evaluate:
System genericFormat: true
2. Open a development browser that displays the class ScreenPMCapture. For example, open a Class Browser on ScreenPMCapture.
3. Select File Out from the Class menu. Or, if you are using a browser other than a Class Browser, select ScreenPMCapture and then File Out from the Classes menu.
4. In the displayed prompter, specify a file name and a target directory; then click on OK.
Examining the filed-out code
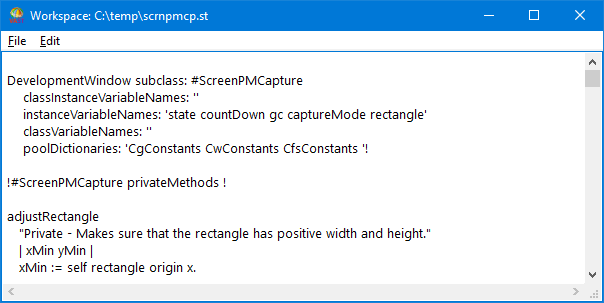
Next, open a Workspace on the filed-out class. (Select Open from a File menu; then enter the path and file name.) The displayed file resembles the following:


The file contains the class definition for ScreenPMCapture and its private instance methods. The first set of text (or chunk) contains the class definition. If ScreenPMCapture were an extended class, instead of a defined class, the class definition would not be in the file. The second chunk is the Smalltalk expression !ScreenPMCapture methods !. If the methods were class methods, the expression would read !ScreenPMCapture class methods !. The expression instructs the system to add the methods to the class ScreenPMCapture. Because you filed out in the generic chunk format, the expression does not indicate that the methods are private. The remaining chunks contain method definitions.
The typical sequence of chunks in filed-out code is class definition, public class methods, public instance methods, and private instance methods (as applicable).
As with the VAST chunk format, an exclamation point (!) separates each chunk. An empty chunk (! !) ends the file.
Changing the filed-out code
To create the class ScreenWinCapture and make the methods suitable for Windows, you must change the filed-out code as follows:
• In the class definition, change ScreenPMCapture to ScreenWinCapture.
• In the method saveGraphicImage, change CgPMBMPFileFormat to CgWinBMPFileFormat.
To change references to PM in the code to Win:
1. Ensure that the cursor for the Workspace is positioned on the top line of the Workspace.
2. From the Edit menu, select Find/Replace.
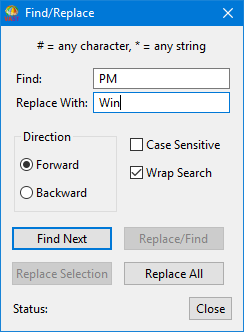
3. In the displayed prompter, type PM in the Search field and Win in the Replace With field. You do not need to enter a replacement string. However, doing so means you can more quickly revise the code.
4. Select Case Sensitive. Also, keep the default options of a forward and no-wrap search.


5. Select Find Next. Then, after the system finds the searched-for text and highlights it, select Replace/Find. The system replaces the current occurrence and finds the next one.
Alternatively, you can simply select Replace All. This option replaces all occurrences of the searched-for text throughout the file, without first giving you the chance not to replace specific occurrences of the text.
6. Repeat step 5 until all three occurrences of PM are replaced with Win. After you change the last occurrence, clicking on Find Next causes the Find/Replace window to display Status: String Not Found along the bottom of the window.
7. Click on Close to close the Search/Replace window.
8. Scroll up to the top of the file and check the changes.
At this point, you might change the expression !ScreenWinCapture methods ! to to !ScreenWinCapture privateMethods ! so it designates the methods as private. But this change is not necessary.
9. Pop up the Edit menu for the Workspace; then select Save.
Filing the changed code into the subapplication DevelopCaptureWin
Now, create the class ScreenWinCapture in your image by filing it into the subapplication DevelopCaptureWin. ( Example: Defining application lineups for OS/2 and Windows describes how to create DevelopCaptureWin. If you have already created DevelopCaptureWin and ScreenWinCapture, but want to complete this example, create another subapplication of DevelopScreenCapture to file the code into. Name it, for example, DevelopFileInTest. You can delete the subapplication after you file in the changed code and examine its contents.)
To file in the changed code:
1. From the list of applications in an Application Manager, select the subapplication DevelopCaptureWin (or your test subapplication).
2. From the Applications menu, select Set As Default.
Note that the Application Manager now names the subapplication as its default above the left pane. Except when filing in code from a Workspace, Transcript, or description pane, you do not need to keep track of what application is the default.
One way to file in the code is to select File In from the Applications menu, and then enter the full path name displayed in the title bar of the Workspace.
For this example, try a different approach:
1. Activate the Workspace window; then select the class definition for ScreenWinCapture with your mouse or the keyboard. When you file in only a class or application definition from a Workspace, Transcript, or description pane, you select the definition and its ending single exclamation point (!). Thus, select the following:
Object subclass: #ScreenWinCapture
instanceVariableNames: 'shell state countDown gc captureMode rectangle
widgetMan radio countLabel buttons frame text'
classVariableNames: ''
poolDictionaries: 'CgConstants CwConstants CfsConstants '!
2. Pop up the Edit menu; then select File In.
Now file in the methods:
1. Select the Smalltalk expression !ScreenWinCapture methods ! (or !ScreenWinCapture privateMethods !) and all text following it to the end of the file.
When you file in methods from a Workspace, Transcript, or description pane, you select code that begins with the Smalltalk expression naming the target class and type of method and that ends with an empty chunk (! !). Thus, you can file in one method, though that method must be preceded by the Smalltalk expression and ended with an empty chunk.
2. Pop up the Edit menu; then select File In.
After you file in the code, the system creates the class ScreenWinCapture and its methods. You can browse the new class by clicking on ScreenWinCapture now displayed in the Application Manager and then selecting Browse Class from the Classes menu.
Last modified date: 04/06/2020