Enhanced Code Editor (Windows Only)
VA Assist Pro replaces the code editor in the base product with a far more powerful editor. This enhanced editor offers advanced visualizations, code analytics, refactoring, multi-language support, a theming engine and much more. The editor is activated within the smalltalk browsers, debuggers, inspectors and workspaces.
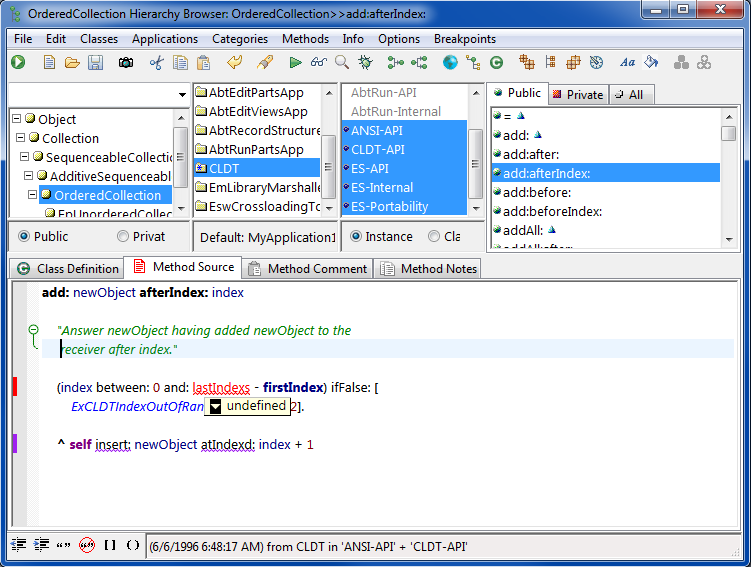
Users who prefer to revert back to the legacy editor may do so by unchecking the setting "Use Scintilla Editor" from the VA Assist Pro settings. This can be accessed from the Transcript's Tools menu (Tools | VA Assist Pro | Settings | Use Scintilla Editor). VA Assist Pro's legacy editor provides so little compared to the current editor that it is not discussed any further within this documentation.
Context Sensitive Popup Editor Menu
One of the best things about Smalltalk and Smalltalk IDEs in general is that they are highly reflexive. Smalltalk systems can ask questions about themselves and generally get the right answers. When we develop in Smalltalk or are just learning about if for the first time, two of the most common questions that we ask are who uses and who implements a method. This is commonly referred to as asking for the “Senders” or “Implementors” of a method. These are two of the most commonly used functions within any Smalltalk IDE, and VAST Plaform is no exception. As such, we want them to be as fast and user friendly as possible.
In VAST Plaform, you can get the senders and implementors of a method in a variety of ways. If you know the exact spelling (or can copy and paste), you can use the “Browse Senders...” and “Browse Implementors...” commands in the Transcript's Tools menu. If you are looking at a method in a browser and see a method send that you would like to track down, you can pull down the Methods menu (or right-click in the methods list) in the browser and select the “Browse Messages” command which cascades to allow you to select “Implementors...” or “Senders...”. Either of these options will result in a popup selection dialog in which you can select the name of one of the messages sent within the current method.
Both of these alternatives work fine, but neither is very elegant. Wouldn't it be much better to simply click your mouse on a message selector (or within any part of it if it is a multi-keyword selector) and then right-click to access the standard popup text menu and just select either “Senders” or “Implementors”? This would be much easier, much quicker and more hypertext-like. The interesting part of the context menu is below:
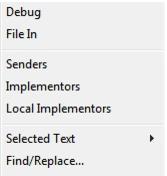
There are two major ways in which this feature could be implemented - the simple way and the hard way. The simple way would be to allow the user to select any text, convert it into a symbol and then look it up. This approach can be implemented very quickly and easily (and is, in fact, how most browser hackers do implement it). The simple approach also doesn't work too well for multi-keyword messages (unless you get really fancy). VA Assist Pro does it the “hard” way, which is to use the Compiler to generate a parse tree and use that to pick out the appropriate selector.
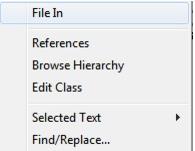
The popup text menu in VA Assist Pro is also context sensitive. If you right click on a class name, you see “References”, “Browse Hierarchy” and “Edit Class”. “References” brings up a method browser showing all references to the class; “Browse Hierarchy” opens a class hierarchy browser on the class; and “Edit Class” opens the standard VAST Plaform editor for a class (the Composition Editor for a visual part or a script browser for a non-visual part). The interesting part of the context menu is below.
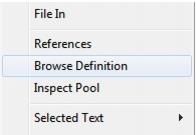
Likewise, if you right click on a pool variable you see entries for “References”, “Find Definition” and “Inspect Pool”. “References” brings up a method browser showing all references to the pool variable; “Find Definition” opens a method browser on the PRAGMA method defining the pool variable; and “Inspect Pool” opens an inspector on the pool itself. See the context menu below.
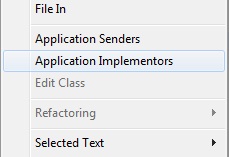
Further customization of the popup text menu is possible via modifier keys. If you hold down the SHIFT key while right clicking on a method, you will see “Local Senders” and “Local Implementors” rather than “Senders” and “Implementors”. If you fold down the CTRL key, you will see “Application Senders” and “Application Implementors”. See sample context menu below.
Enhanced Keyboard Shortcuts
This section will present some of the additional keyboard shortcuts that are available in the enhanced editor. The enhanced editor has been developed to maintain the existing keyboard shortcuts available in the legacy editor, to the extent that was possible. As such, this will not be a comprehensive overview of all keyboard shortcuts, but rather the new keyboard shortcuts and behavior only available in the enhanced editor.
•<Tab> - Indent/Block Indent. Press <Tab> to indent lines of text. If more than one line is selected, than all selected lines will be indented together (block indent).
•<Shift+Tab> - Unindent/Block Unindent. Press to unindent lines of text. For single line unindent, position the text cursor at the beginning of the line and press <Shift+Tab>. To unindent multiple lines of text (block unindent), simply highlight the lines that should be unindented and press <Shift+Tab>
•<Alt+Up> - Move Selected Lines Up.
•<Alt+Down> - Move Selected Lines Down.
•<Ctrl+L> - Delete Selected Lines.
•<Ctrl+Alt> - Column selection. Hold this key combination while selecting text and it will produce multiple column-aligned selections which can be copy and pasted.
Selection Drag Drop
The user can select one or more lines of text, hover the mouse pointer over the text and drag to a different location by holding down the left mouse pointer during the drag. This allows the user to quickly relocate sections of text in a more visual manner. The user will see a visual indication on the mouse pointer that drag is active.
Multiple Undo/Redo
VA Assist adds multiple undo/redo text support to all enhanced editors within browsers, debuggers, inspectors and workspaces. There is no hard limit on the number of undo operations.
Furthermore, VA Assist's multiple undo/redo support includes coalescing, so contiguous insertions and deletions will be grouped into a single undo operation. This will keep the user from having to activate undo for every character that was typed, but instead VA Assist will attempt to choose sensible sets of characters to coalesce.
Hardware-Accelerated Rendering
VA Assist's new enhanced scintilla-based editor takes advantage of hardware-accelerated rendering through the use of Direct2D/DirectWrite technology. This allows many aspects of rendering, both font and effects, to be offloaded from the CPU to the Graphics Processing Units (GPU) onboard modern graphics cards.
In addition to performance improvements, the editor will be able to draw smoother, more visually appealing, fonts and effects than was previously possible.
The user can toggle DirectWrite at any time by using the Code Font Selection dialog available in the global File menu (File | Set Code Font...). On the bottom-right of the dialog box is a check box titled "Enable DirectWrite" which you may select/unselect.
Direct2D/DirectWrite is a fairly recent Microsoft technology and requires Windows 7 or above in order to make use of it.
Abbreviations
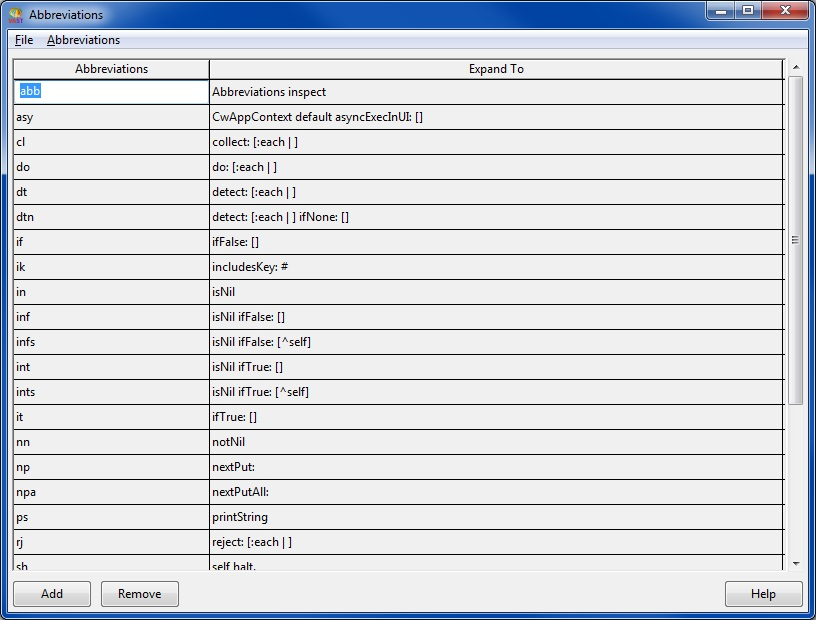
Abbreviation expansion is provided in all text views. Just type in an abbreviation and hit SHIFT+Space to have it expanded. For example, typing “int” followed by SHIFT+Space will replace the text “int” with “isNil ifTrue: []”. If an abbreviation expansion ends in a trailing bracket or parenthesis, the text insertion point is placed to its left. If no trailing bracket or parenthesis is included, the text insertion point is placed at the end of the expanded text. A number of different abbreviations are provided by default and all may be customized via the Abbreviations browser (Options | Abbreviations | Configure...).
An associated function makes it easy to enter variable names (method args, temporaries, inst vars and class vars). Just type the first letter or two of a variable name and hit F11. If the match is unambiguous, the variable name will be automatically entered. If more than one variable is a match, you will be asked to select the appropriate choice. Hit F11 by itself (without first entering some text) and a full list of available variables will be presented.
Auto Indent
If auto indent is turned on (Options | Auto Indent), the text insertion point will automatically indent to match the prior line when you hit Enter. If the prior line ended with a right bracket, the new line will indent one extra tab automatically (as is the norm for Smalltalk syntax).
Bracket Highlighting
Bracket Highlighting is the use of stylization to indicate matching pairs of ()[]{} enclosure characters. This feature is activated when the text cursor is positioned next to any of these characters and allows the user to quickly identify the start and end of enclosed expressions or blocks.

Additionally, bracket highlighting allows for stylization of unmatched enclosure characters in the event that the user added to many, or not enough, of them.

Bracket Highlighting may be quickly enabled/disabled by checking/unchecking the following menu item from any browser's Option menu (Options | Code Assist | Bracket Highlight)
Bracket Highlighting Configuration Options
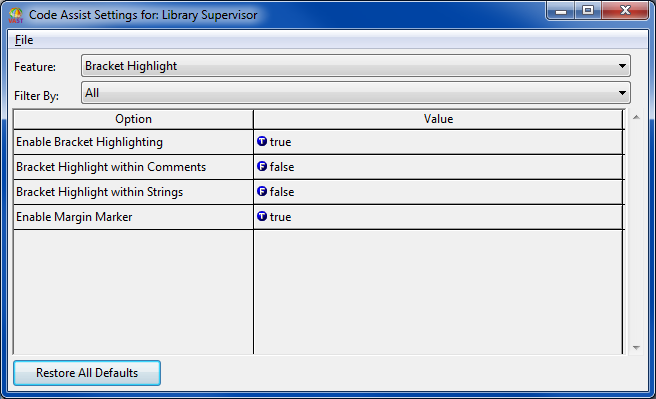
Bracket Highlighting configuration options can be accessed by (Options | Code Assist | Configure...) in any browser menu and selecting "Bracket Highlight" from the Feature combo box in the Configuration UI.
The following is a description of all configuration options:
•Enable Bracket Highlighting - Enable/Disable bracket highlighting in the global development environment.
Default: true
•Bracket Highlight within Comments - Enable/Disable bracket highlighting within comments.
Default: false
•Bracket Highlight within Strings - Enable/Disable bracket highlighting within comments.
Default: false
•Enable Margin Marker - Enable/Disable margin marker to help show the location of offscreen matches.
Default: true
Smart Highlighting
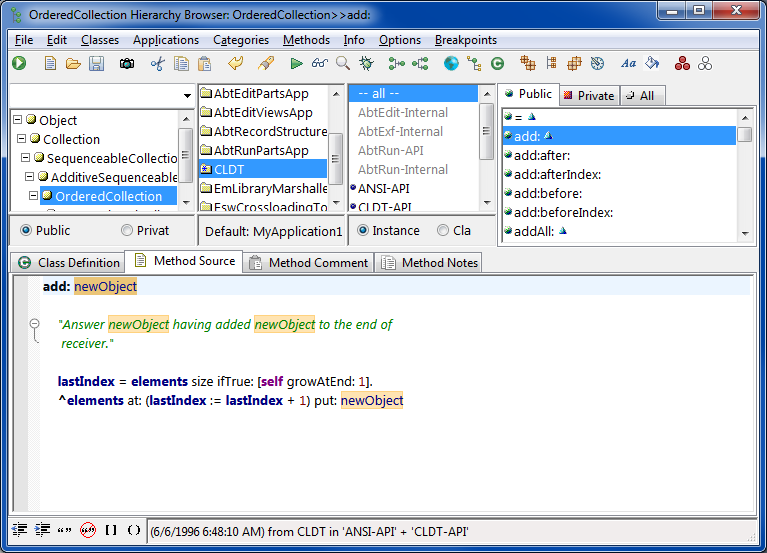
Smart Highlighting is a useful feature to (optionally) apply stylization to a selected word, and any matching words, in the editor. This allows the user to quickly see everywhere a particular word is used in the document without having to open up a search dialog and iterate through matches one by one.
During code editing, the user will often want to see where variables are defined or used within a given method. With smart highlighting, the user just needs to highlight the desired variable to instantly see all the matches in the view. All matches not visible will be stylized once they are brought into view by scrolling.
Smart Highlighting may be quickly enabled/disabled by checking/unchecking the following menu item from any browser's Option menu (Options | Code Assist | Smart Highlight)
Smart Highlighting Configuration Options
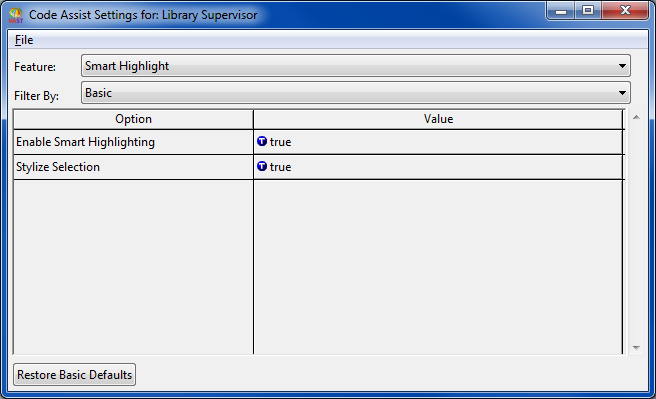
Smart Highlighting configuration options can be accessed by (Options | Code Assist | Configure...) in any browser menu and selecting "Smart Highlight" from the Feature combo box in the Configuration UI.
The configuration UI allows you to restore the default settings for the configuration items that are in view. This gives the user the ability to restore just the settings in a particular category, without effecting the settings in other categories. If you would like to restore all settings, select the "All" category in the filter combo box and press the "Restore All Defaults" button on the bottom-left of the configuration UI.
The following is a description of all configuration options:
•Enable Smart Highlighting - Enable/Disable smart highlighting in the global development environment.
Default: true
•Stylize Selection - Apply stylization to the selected word, in addition to matched words. By default this is set to false which means that the selected word will retain the normal text selection color.
Default: false
Call Tips
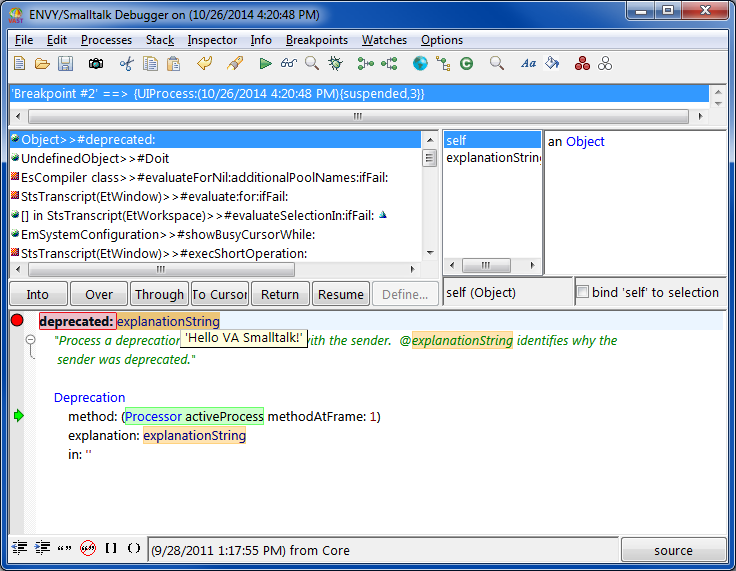
VA Assist Pro's enhanced editor uses call tips to provide the user with more information about a specific section in the editor. There are a number of areas where this is useful.
As will be discussed in the "Code Analytics" section below, call tips are the primary mechanism used to report and repair issues with code.
Call tips are also used during debugging sessions. If a user hovers the mouse pointer over a variable or global in a debugger, a call tip displaying its value will show. The user may click this call tip which results in an inspector on the value of the variable.
VA Assist keeps track of call tip regions. While the user's mouse pointer hovers within this region, the call tip will stay active. Once the user moves the mouse pointer outside this region, the call tip will automatically close. This region is a dynamically sized invisible box that encompasses the call tip and mouse pointer, and is designed to give the user the space required to drag the mouse pointer to the call tip.
Call tips will dynamically format their content so they don't take up to much display space. If the user wants to see the complete contents of a formatted call tip, they can click on it to bring up an inspector.
Action List Call Tips

In some contexts, call tips will be displayed which the user can interact with and provide input to. These are called Action List Call Tips. These are call tips that start out in a collapsed state, where they display a brief message to the user like traditional call tips do. However, there will be a down arrow button on the edge that, once pressed, will expand to produce a list of items from which the user can select. (as shown above).
When an action list call tip is showing, the up/down arrows on the call tip can be pressed using the mouse. This will change the selected item in the list. Applying the selected item is done by double-clicking the call tip.
If the "Traversal Keys Enabled" configuration option is true, then the keyboard can also be used to select and apply a list item in a manner similar to any normal list widget.
Call Tips Configuration Options
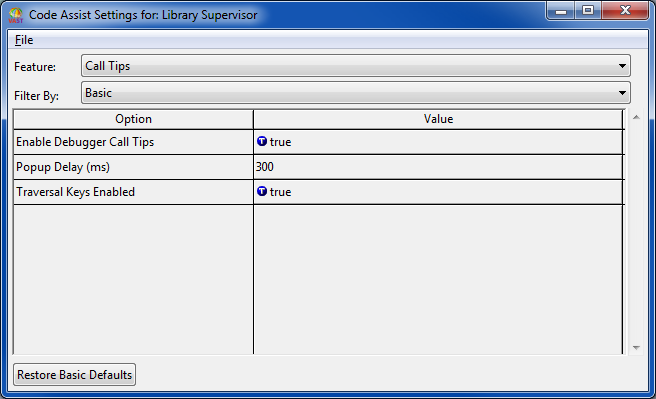
Call Tips configuration options can be accessed by (Options | Code Assist | Configure...) in any browser menu and selecting "Call Tips" from the Feature combo box in the Configuration UI.
The following is a description of all configuration options:
•Enable Debugger Call Tips - Enable/Disable call tips in the global development environment. If enabled, call tips will be available during debugging sessions.
Default: true
•Popup Delay (ms) - Once the mouse cursor is positioned over a call tip region, this option defines the number of milliseconds to wait before call tips will show.
Default: 300
•Traversal Keys Enabled - Used for action list calltips that mimic list widgets. If this is enabled, the the up/down arrows on the keyboard can be used to change the selected item within the calltip list. Pressing <Enter> will apply the selected item.
Default: true
Line Numbers
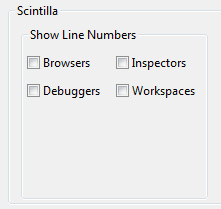
VA Assist Pro code editor can be configured to show line numbers in the left margin area. Line numbers are supported in browsers, debuggers, inspectors and workspaces and can be configured independently of one another.
To enable/disable line numbers for one or more of the window types listed above, open the VA Assist Pro Setup dialog available from the Transcript's Tools menu (Tools | VA Assist Pro | Setup) and select the "General" tab. In the Scintilla section the user will find a sub-section named "Show Line Numbers". From this sub-section the user can specify the various window types that should show line numbers. Once an item is checked, the change will take place immediately.
Code Folding
VA Assist Pro's editor offers a sophisticated code folding feature. Code folding allows for sections of code to be hidden or shown selectively. In VAST Plaform, this feature is used for multiline comments. Folding a multiline comment collapses what may potentially be a page or more worth of comments down to just one line. By doing so, the developer can quickly see the source code and expand the comments back again when they wish.
A special margin, called the folding margin, exists on the left part of the editor. This margin shows a series of markers to indicate if the comment is expanded or collapsed. Code Folding may be quickly enabled/disabled by checking/unchecking the following menu item from any browser's Option menu (Options | Code Assist | Code Folding)
Code Folding Configuration Options
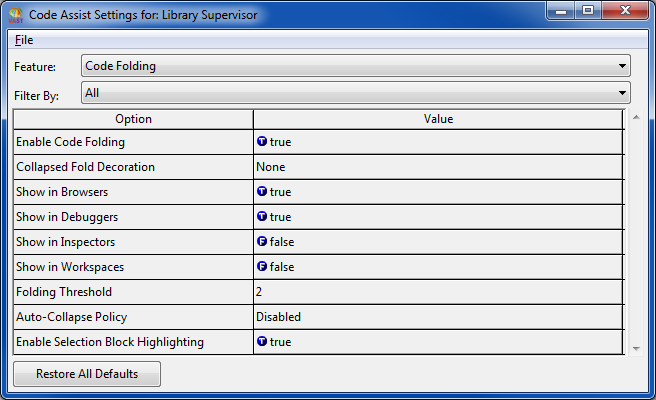
Code Folding configuration options can be accessed by (Options | Code Assist | Configure...) in any browser menu and selecting "Code Folding" from the Feature combo box in the Configuration UI.
The following is a description of all configuration options:
•Enable Code Folding - Enable/Disable code folding within the environment.
Default: true
•Collapsed Fold Decoration - Visual indication used for folding areas that have been collapsed.
Default: None
•Show in Browsers - Show/Hide in the browsers if code folding is enabled.
Default: true
•Show in Debuggers - Show/Hide in the debuggers if code folding is enabled.
Default: true
•Show in Inspectors - Show/Hide in the inspectors if code folding is enabled.
Default: false
•Show in Workspaces - Show/Hide in the workspaces if code folding is enabled.
Default: false
•Folding Threshold - The number of lines in a multiline comment before folding will be applied. A threshold of 2 means all multiline comments will have folding applied.
Default: 2
•Auto-Collapse Policy - Policy to control which foldable comments are automatically collapsed when new content loads.
Default: Disabled
•Enable Selection Block Highlighting - Enable highlighting in the margin of the selected fold block.
Default: true
Themes
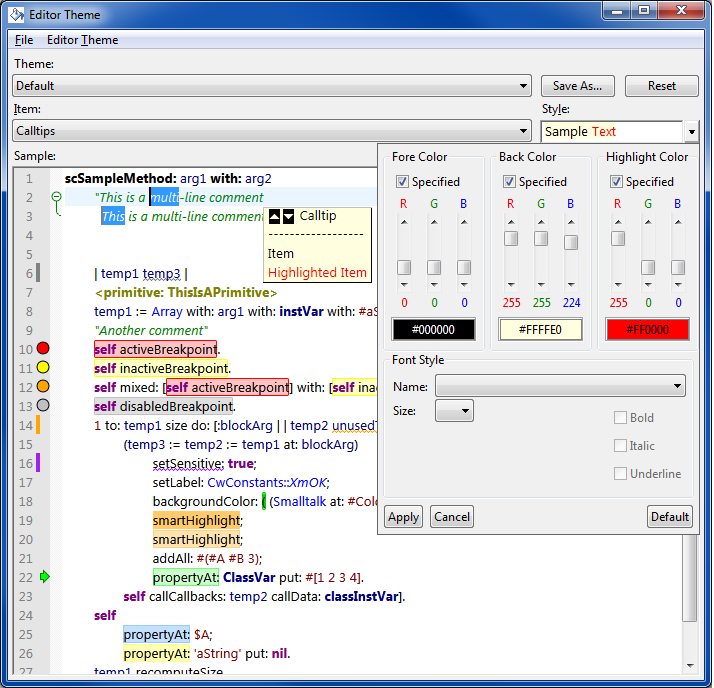
VA Assist Pro's offers a fully customized theme engine for the code editor. This means that every single visual effect used within the editor is decorated according to a specified theme.
Editor Theme UI
A theme is a specification of visual styles to be applied to various named items in the editor. These themes can be named and saved so the user can easily switch between them.
In order to facilitate the creation and modification of themes, a UI is available that allows the user to tweak any available theme setting. This UI can be accessed from the Options menu of any browser (Options | Editor Theme | Configure...).
There are a number of predefined themes to choose from. Once the Editor Theme UI is open, just change the theme from the Theme combobox. To make your own themes, simply choose one of the predefined themes, make your style changes, and press the Save As... button (to the right of the Theme combobox). This will allow you to name and save your new theme.
There are a large number of theme Items available. While you can look through all the choices from the Items combobox, it is far simpler to simply click on the visual item you wish to modify inside the sample editor. Doing so will automatically select it from the Items combobox.
Once an item is chosen, you will see a preview of it in the Style section of the UI (Below the Save As... and Reset button). Within this section is a dropdown arrow, that when clicked, will display a style customization panel that is unique to the chosen item. Depending on the item, you can tweak styles like foreground and background colors, fonts names and sizes and various transparency settings. The preview within the Style section will constantly update to show you what impact your setting changes are having.
Syntax Color Highlighting
The largest collection of styled items within a theme are used for syntax color highlighting. Syntax color highlighting is a bit of a misnomer because VA Assist Pro's implementation can change not just the color, but also the font name and size. However, this is traditionally what this feature is called.
VA Assist Pro's syntax color highlighting will style text as you type it. This is different from most legacy implementations that typically wait for a period of time to elapse and then calculate the colors all at once.
Since syntax color highlighting is available in workspaces and inspectors, VA Assist Pro's implementation provides much higher levels of fault-tolerance when it comes to determining what visual style various tokens should use. This is important because it is not always reasonable to expect that text found in workspaces and inspectors create well-formed source (a general requirement for parsers).
•

Language Modes in Workspaces
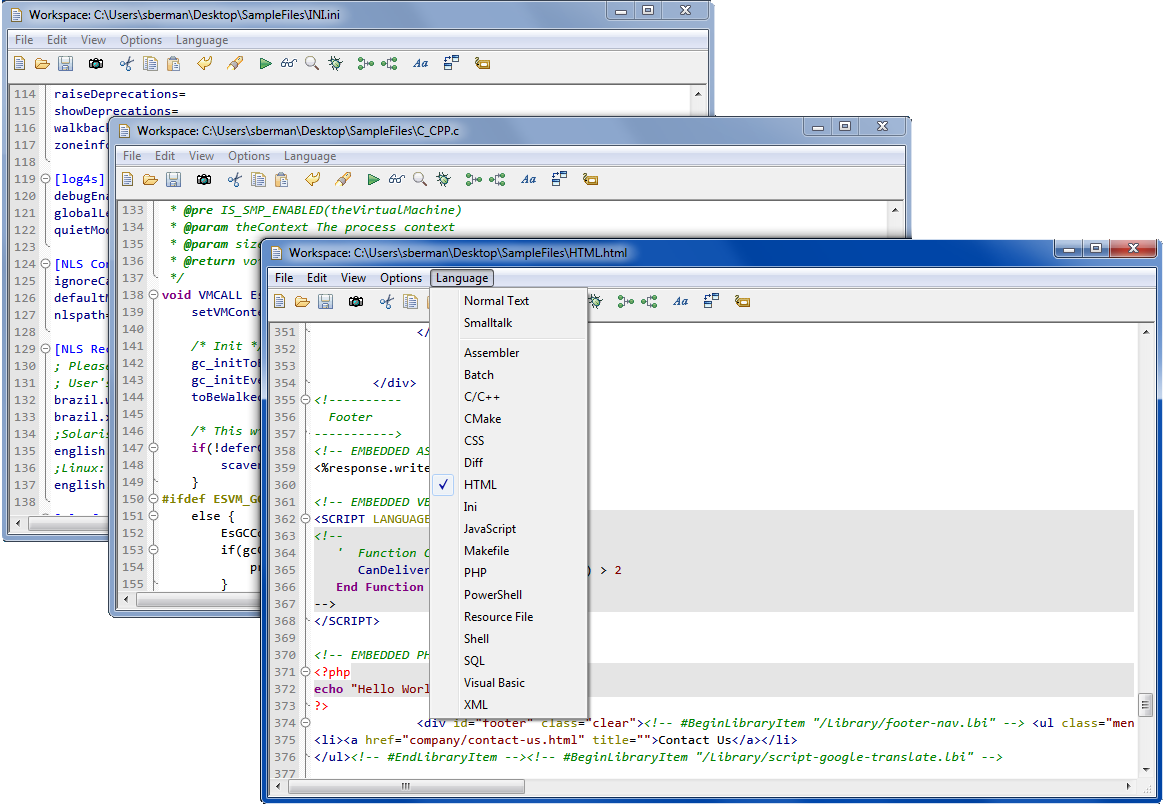
When a workspace is opened, there will be a new menu called Language available in the menu bar. The Language menu shows the different language modes the workspace is capable of. The current language mode will have a checkmark next to the menu item.
To switch the editor into a new language mode, simply select one of the language menu items in the Language menu.
Opening a new workspace will default to using the Smalltalk language mode. Opening a new file in a workspace will use the language mode that is dynamically determined by the filename. If a language mode could not be identified from the filename, then the Normal Text language mode is selected.
Last modified date: 05/20/2022